Integrating Other External Programs or Components
LabVIEW can also connect to or integrate a wide variety of external programs and components, often more easily than when working with DLLs.
Python
For those interested in learning the Python programming language, this webpage comes highly recommended: https://py.qizhen.xyz.
Installing Python
LabVIEW's Python-invoking code must use Python's own interpreter, necessitating the installation of Python on your computer. Each LabVIEW version supports only specific Python versions (for instance, LabVIEW 2021 supports Python 3.6 to 3.9). Furthermore, Python code called by LabVIEW may require certain library versions. To prevent compatibility issues with different Python versions and libraries, it's advisable to use professional tools for managing the necessary libraries and environments. The most popular environment management tool for Python is Conda. The leading installation packages in the open-source community that include Conda and Python are Miniconda and Anaconda. Miniconda offers a more streamlined package, including only the core libraries, with additional libraries installable as needed. It's ideal for beginners in Python. In contrast, Anaconda's installation package is roughly ten times larger than Miniconda's, containing nearly all commonly used libraries and is best suited for users with ample disk space.
When downloading the installation package, be mindful of whether it is 64-bit or 32-bit. This specification must align with that of LabVIEW; thus, 64-bit LabVIEW can only utilize 64-bit Python. Once downloaded, the software can be installed directly.
On Linux, Conda automatically initiates upon opening the terminal. Users will notice a change in the terminal prompt format. If you prefer not to start Conda automatically, you can disable this feature with the following command:
conda config --set auto_activate_base false
For Windows users, Conda can be accessed via the PowerShell or command window created through the Conda installation package's start menu. For instance, by selecting "Anaconda Prompt" from the start menu, you can launch Conda.
To avoid conflicts with other Python programs, it's necessary to create a new environment for the Python program LabVIEW will call. This can be done using the conda create command, naming the new environment lv, and specifying Python version 3.9 for it:
(base) qizhen@deep:~$ conda create --name lv python=3.9
The conda env list command displays all the environments you've created, including their folder paths. Remembering this path is crucial, as it will be needed when setting up LabVIEW to call Python code.
(base) qizhen@deep:~$ conda env list
# conda environments:
#
base                  *  /home/qizhen/anaconda3
lv                       /home/qizhen/anaconda3/envs/lv
In the list above, lv is the newly created environment, while base is the default. To configure or test the new environment, you must first switch to it. Use the conda activate command for switching:
(base) qizhen@deep:~$ conda activate lv
(lv) qizhen@deep:~$
Notice how the environment name in the command prompt has changed from (base) to (lv). Now, you're ready to configure the current environment, for example, by installing Python libraries with the pip command or executing Python code.
Methods for Integrating Python
Prior to LabVIEW 2018, integrating Python required running the Python interpreter as an application by executing an EXE file, and then executing the desired Python script by configuring command-line arguments. This approach was also applicable for invoking scripts written in other scripting languages. However, with the growing popularity of Python, LabVIEW introduced three specialized nodes for integrating Python programs post-2018.
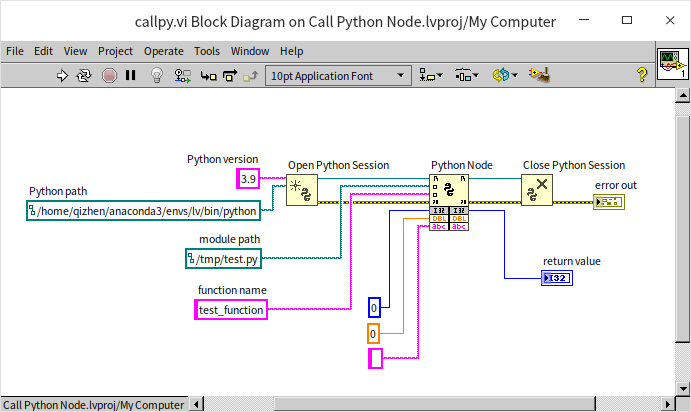
These three nodes include:
- Open Python Session: This node is responsible for initializing the Python interpreter. It requires two parameters: "Python version", which specifies the version of the Python interpreter. For instance, LabVIEW 2021 supports Python versions 3.6, 3.7, 3.8, and 3.9. In my setup for LabVIEW, Python 3.9 is installed, hence the input here is limited to 3.9. The second parameter, "Python path", denotes the location of the Python interpreter. It's important to select the path to the Python interpreter that has been specifically prepared for LabVIEW, especially if multiple Python interpreters or environments are installed on your computer.
- Python Node: This node facilitates the calling of a function within a Python script. The "module path" refers to the file path of the Python script being invoked; "function name" refers to the name of the function within that script. The adjustable section at the bottom of this node allows for the configuration of parameters to be passed to the Python function, as well as for retrieving the function's return value. Configuring the Python Node is easier than invoking a DLL, as it permits the specification of parameter data types through linked constants or controls, which must align with the settings within the Python script.
- Close Python Session: Employed to terminate the Python interpreter once the integration process is concluded.
Creating a Test VI
Creating a Python script file (*.py) with the required functions and then switching back to LabVIEW to invoke it can be a tedious process. To streamline demonstrations, I'd prefer to write Python code directly on the VI block diagram and execute it from there. This requires only minor modifications to the LabVIEW code shown in the figure above:
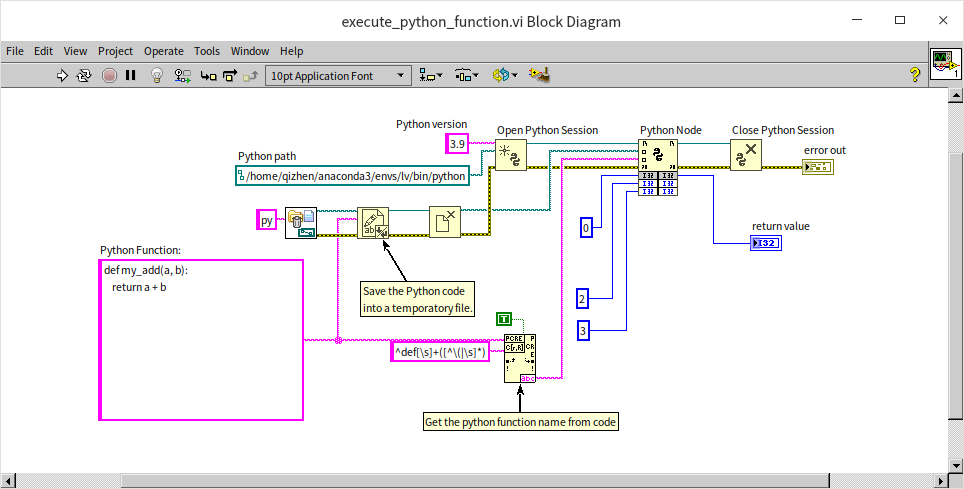
The function written in Python is contained within a string constant. When the program is executed, it first saves this code to a temporarily generated .py file. By then calling this .py file using the Python Node, the Python function within the string constant is executed. If the Python code in the string constant includes only one function, we can use the "Match Regular Expression" node from the diagram above to automatically extract the function name from the Python code.
Turning the above code into a sub-VI, with the Python code as an input parameter, would make usage even more convenient. The main challenge in creating such a sub-VI lies in the variable nature of the inputs and outputs required by the "Python Node", Is it possible to create a sub-VI with a variable number of parameters and data types, similar to the "Python Node"? The answer is affirmative, although it's a bit more complex than making a standard sub-VI. Readers interested in this approach may refer to the section on XNode.
Creating an XNode can be intricate, so here we opt for a simpler compromise: incorporating all nodes except for the Python Node and Close Python Session into one sub-VI:
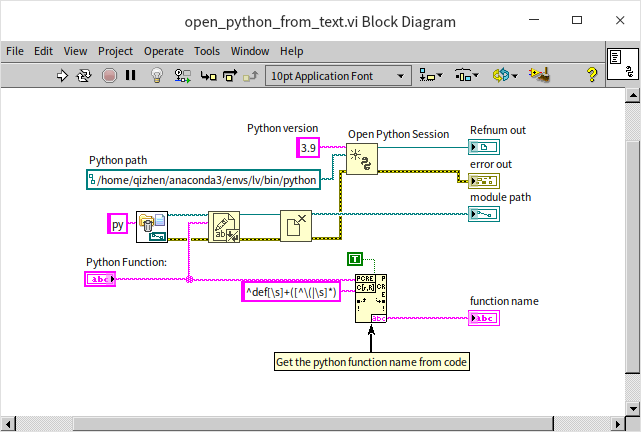
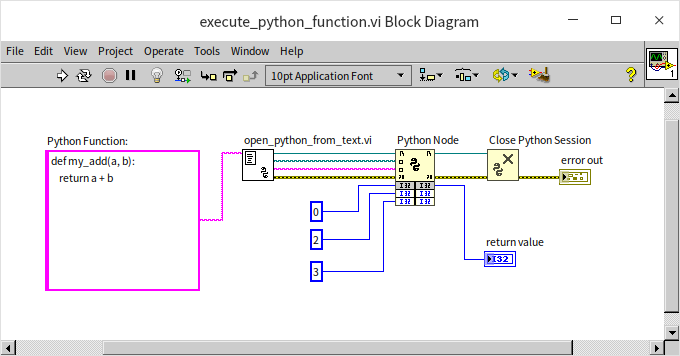
With this approach, the demonstration VI becomes significantly more streamlined:
Setting Input and Output Parameters
The Python code in the aforementioned VI is remarkably simple, consisting of a single function named my_add:
def my_add(a, b):
    return a + b
This function takes two input parameters, a and b, and returns their sum. Thus, when integers 2 and 3 are fed into this Python function from a LabVIEW program, the outcome is 5.
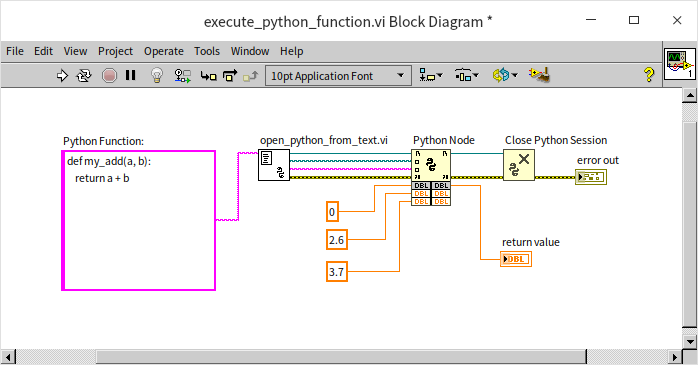
Python's approach to variables and input/output parameters is dynamically typed. This means there's no need to define the data types of variables ahead of time in the Python script; the Python interpreter determines the validity of variable data types at runtime. Consequently, the same Python script can be used in LabVIEW with varying input and output parameter types. For example, passing the floating-point numbers 2.6 and 3.7 to the same Python function yields a return value of 6.3.
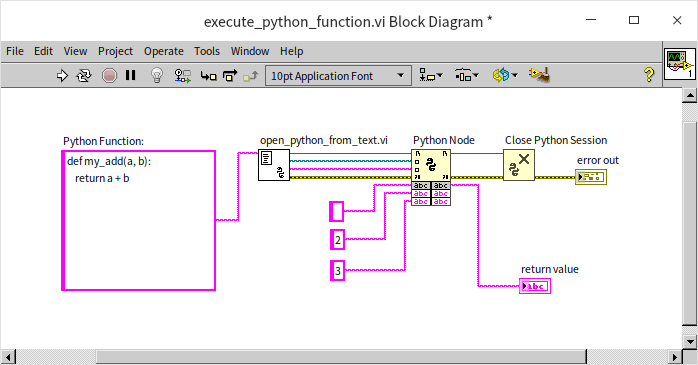
Strings are also compatible: supplying the strings "2" and "3" to the same Python function concatenates them, resulting in the string "23".
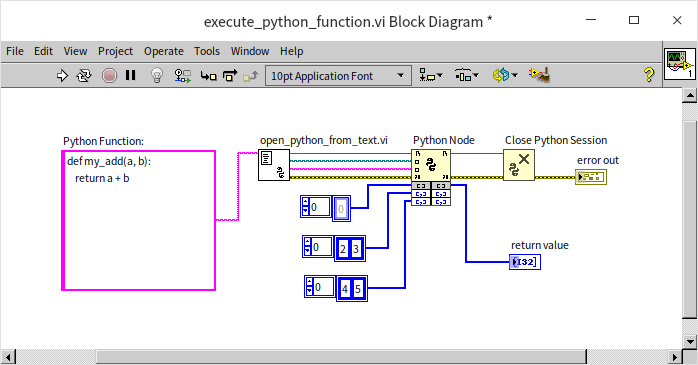
Arrays function similarly: the behavior mirrors that of strings, with the output being a concatenation of the two input arrays. Passing [2, 3] and [4, 5] to the Python function returns [2, 3, 4, 5].
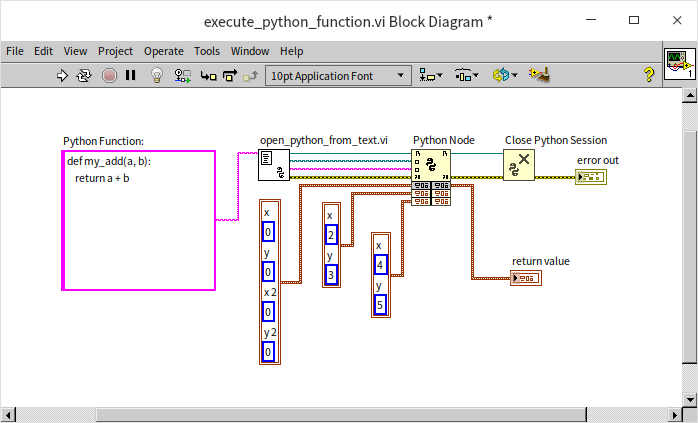
Clusters are feasible as well, though their behavior might be unexpected. Cluster data passed into Python is represented as tuples—a data type similar to arrays but immutable. The "+" operation for tuples, akin to arrays, concatenates the input data. Hence, passing the clusters (2, 3) and (4, 5) to the Python function returns a cluster with four elements: (2, 3, 4, 5).
In the described scenarios, if the two parameters have disparate data types, such as one being a float and the other a string, the Python interpreter will raise an error during runtime since a float and a string cannot be concatenated using the "+" operation.
Python code allows for the specification of preferred data types for variables, as illustrated below, where the input parameters are recommended to be strings:
def string_concat(a: str, b: str) -> str:
    return a + b

print(string_concat(2, 3))
However, these suggested data types are, in essence, merely recommendations. Even if integers are used as parameters for this function, the Python interpreter won't raise an error. (It's worth noting that Python has specialized tools and development environments capable of detecting and reporting such type mismatches, making the inclusion of suggested data types in Python code beneficial.) Similarly, when LabVIEW invokes this function, it can also input data of various types without causing errors.
When Python function parameters are numbers, strings, or clusters (represented as tuples in Python), these parameters are passed by value. This means any modifications made within the Python function will not affect the values of these parameters outside the function. Within the Python function, if you're dealing with numeric, string, or tuple data, you can't pass these back to the VI through output parameters; they can only be returned to LabVIEW via the function's return value. If the input parameter is an array, however, it is passed by reference when calling the Python function (the distinction between passing by value vs. passing by reference is further elaborated in the section on LabVIEW Execution Mechanisms). This allows the Python function to alter the data within the input array and return the modified values through the same parameter. Consider the VI below:
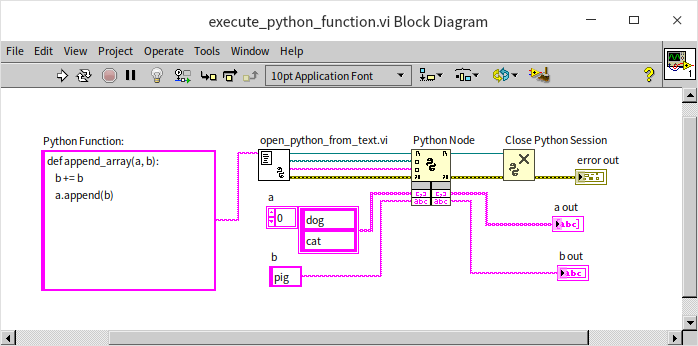
This VI invokes a Python function named append_array, which doesn't have a return value. The function accepts two inputs: a string array "a" and a string "b", Inside the Python function, both inputs are modified; "b" is duplicated and concatenated. For example, if the input value for "b" is "pig", its value within the function after the operation becomes "pigpig", Next, the string "b" is appended to the array "a", If the input value for "a" is ["dog", "cat"], it becomes ["dog", "cat", "pigpig"] after the operation.
When running the VI depicted above, since the input data "a" is an array, we can observe its modification within the Python function, leading to the control "a out" displaying ["dog", "cat", "pigpig"]. The input data "b" is a string, passed by value, so any internal modifications by the Python function won't be reflected in the output, leaving the control "b out" unchanged at "pig",
Python allows functions to return multiple values. For instance, executing the following script results in x = 5; y = "pig":
def return_both(a, b) -> str:
    return a, b

x, y = return_both(5, "pig")
Though returning multiple values offers convenience, it's essentially akin to the function returning a single tuple, (5, "pig"). In LabVIEW, clusters can receive this tuple data. Running the VI below, you'll observe that the cluster control "return value" contains (5, "pig"):
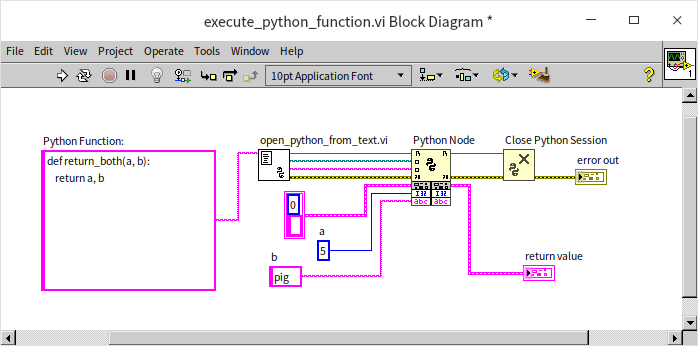
LabVIEW is limited to passing only the simple data types previously described when calling Python functions. Complex types, like classes and maps, cannot be directly passed to Python functions. For handling complex data types, one strategy is to break down the complex data into simpler types for transmission, or alternatively, serialize complex data into formats like JSON or XML before transfer.
Case Study: QR Code Generation
While most tasks achievable with Python can also be realized using LabVIEW, Python enjoys several distinct advantages. Among these, the most significant is its robust open-source community. This community has enriched Python with an extensive collection of open-source, freely available packages (or libraries), some of which are unique to Python, especially in areas like artificial intelligence. Currently, more than 90% of AI research outputs (published papers) are based on the Pytorch library, which originated from the Torch library in Lua but has since ceased development.
For our demonstration, let's pick a straightforward task: generating a QR Code. LabVIEW does not inherently support QR Code generation and relies on integrating external open-source libraries for such capabilities. Python, however, has ready-to-use libraries for this purpose, such as the qrcode library. The first step is to install this library in the Python environment using the pip command:
(base) qizhen@deep:~$ conda activate lv
(lv) qizhen@deep:~$ pip install qrcode[pil]
Collecting qrcode[pil]
  Downloading qrcode-7.3.1.tar.gz (43 kB)
     ━━━━━━━━━━━━━━━━━━━━━━━━━━━━━━━━━━━━━━━━ 43.5/43.5 kB 2.7 MB/s eta 0
00:00
  Preparing metadata (setup.py) ... done
Collecting pillow
  Downloading Pillow-9.2.0-cp39-cp39-manylinux_2_28_x86_64.whl (3.2 MB)
     ━━━━━━━━━━━━━━━━━━━━━━━━━━━━━━━━━━━━━━━━ 3.2/3.2 MB 4.4 MB/s eta 0:0
:00
Building wheels for collected packages: qrcode
  Building wheel for qrcode (setup.py) ... done
  Created wheel for qrcode: filename=qrcode-7.3.1-py3-none-any.whl size=40386 sha256=ff22258cd1a100
c88e4636b93a077a5ad0319933e434e098140210242f0637c
  Stored in directory: /home/qizhen/.cache/pip/wheels/93/54/16/55cec87f8d902ed84b94ab8fdb7e89ae1158
06e130bc83b03
Successfully built qrcode
Installing collected packages: qrcode, pillow
Successfully installed pillow-9.2.0 qrcode-7.3.1
(lv) qizhen@deep:~$
Many Python functions related to image processing, including those in the qrcode library, depend on Pillow, an image processing library. Thus, installing qrcode also necessitates the installation of Pillow.
With the required libraries installed, we can proceed to write a VI that utilizes Python code to invoke the qrcode library:
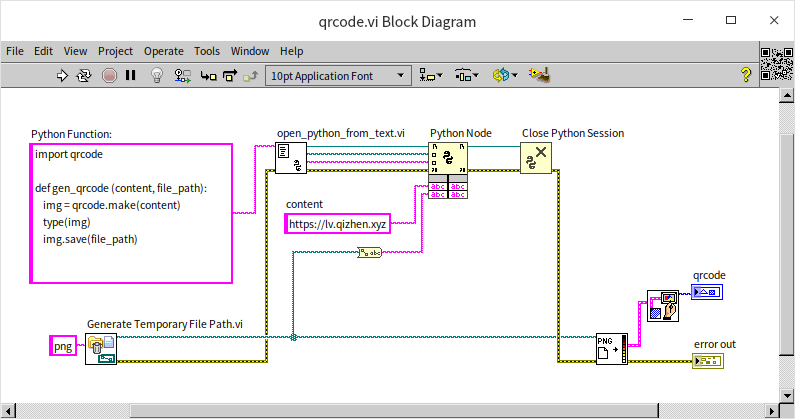
This demo VI features a Python function named gen_qrcode, designed to generate a QR Code by calling a function from the qrcode library. The demo uses default settings for all parameters, such as the QR Code's size and style, resulting in exceptionally straightforward code. The Python function requires two inputs: the content of the QR Code, for which we've used the homepage URL of this book in our demo, and the location to save the generated QR Code, which is a temporary file in this case. After generating the QR Code, the VI displays it on an image control located on the VI's front panel:
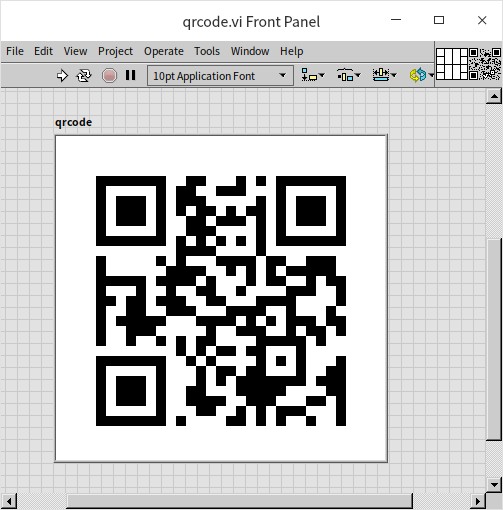
You can now scan this QR Code to visit the homepage of this book.
ActiveX
ActiveX Controls
ActiveX commonly refers to controls that utilize the standard Component Object Model (COM) interface for the purpose of object linking and embedding. Initially, ActiveX controls were designed specifically for Microsoft's Internet Explorer. By establishing interface specifications between containers (programs that utilize ActiveX controls) and the components (the ActiveX controls themselves), it enabled users to seamlessly integrate Active controls into a variety of containers without the need to alter the control's underlying code. ActiveX controls enhanced web pages by facilitating interaction between scripts and controls, thereby producing richer interactive effects.
Over time, the application of ActiveX standards expanded significantly across different software sectors. This led to a surge in software adopting these standards and the development of a vast array of feature-rich ActiveX controls. Though theoretically possible, creating an ActiveX control with LabVIEW is known to be quite complex, and there are no well-documented cases of this being successfully accomplished. Conversely, incorporating ActiveX controls within LabVIEW projects is remarkably straightforward. ActiveX controls can effortlessly introduce capabilities such as web browsing and Flash animation playback into applications.
This book is primarily focused on introducing the LabVIEW language. For comprehensive details on ActiveX specifications and control features, specialized literature should be consulted. If your interest lies solely in utilizing ActiveX controls, delving into the intricacies of ActiveX specifications isn't necessary. Understanding the functionalities (methods and properties) of the controls you intend to use and knowing how to implement them is sufficient.
Calling ActiveX Controls
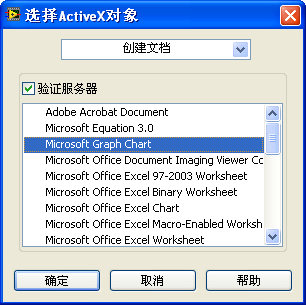
To implement ActiveX controls, one must first place an ActiveX container on the VI's front panel, available under the "Modern -> Containers" section of the control palette. By right-clicking on the ActiveX container control and selecting "Insert ActiveX Object", LabVIEW will display a list of all ActiveX controls available for use:
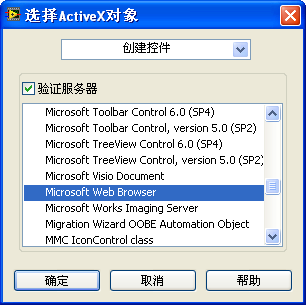
After selecting a control, it can be positioned within the VI's front panel ActiveX container. It's important to note, however, that not all ActiveX controls appearing in the "Select ActiveX Object" dialog are readily usable within LabVIEW. Certain ActiveX controls are proprietary, requiring authorization from their respective manufacturers before they can be deployed.
Web Browsing
LabVIEW itself doesn't come with a built-in control for web browsing. However, it can utilize the ActiveX control provided by Internet Explorer for web browsing purposes. To incorporate web browsing functionality, you first need to place an ActiveX container on the front panel of your VI and then insert the "Microsoft Web Browser" control into it.
In newer versions of LabVIEW, a selection of commonly used ActiveX and .NET controls, including those for web browsing and Windows Media Player, has been conveniently placed on the control palette under the ".NET & ActiveX" category for easy access:
It's important to remember that these controls are provided by third-party companies as ActiveX and .NET controls, not directly by LabVIEW. To browse a webpage, you simply use the "Navigate" method of the "WebBrowser" control:
Executing the program with the "Navigate" method will display the desired webpage:

Bear in mind that ActiveX controls typically come with a wide range of properties and methods. If you wish to fully leverage these, consulting the help documentation of the specific ActiveX control is necessary. Should you have difficulty finding the appropriate documentation, reaching out to the manufacturer of the ActiveX control for support would be the next step.
Playing MP3 Music
The Windows Media Player ActiveX control is equipped with media playback capabilities. If your application requires the playback of MP3 files or videos, this control is a suitable choice. Below is an example of a VI's front panel that utilizes the Windows Media Player ActiveX control for media playback:
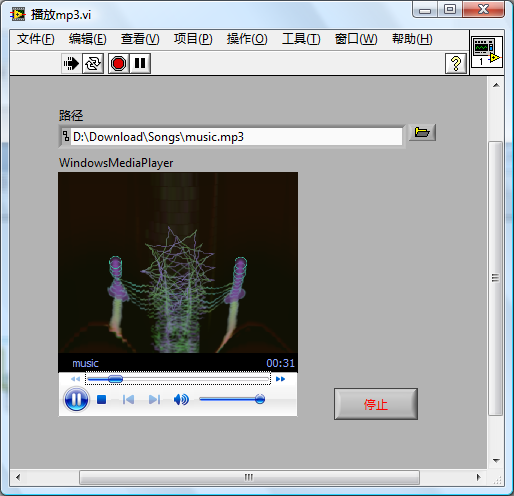
And here is the block diagram that implements the media playback functionality:

ActiveX Control Events
In addition to properties and methods, ActiveX controls can also trigger events. Take the "Microsoft Toolbar Control" as an example: when a user clicks a button on the toolbar, it generates a "Button Click" event.
LabVIEW's event structure cannot directly capture these events, but they can be handled through callback VIs specifically designed for this purpose. To set up a callback VI for an ActiveX event, the "Register Event Callback" node found in the "Connectivity -> ActiveX -> Register Event Callback" section of the function palette is used.
This event callback registration node requires three inputs: "event", "VI reference", and "user parameter", To use it, first, the ActiveX control is passed to the "event" input, then you select the event you need to handle from the dropdown associated with this input. For instance, if we're dealing with the "ButtonClick" event from the "Toolbar" control:
Once the event is selected, you might need to pass specific user parameters. The "user parameter" input of the event callback registration function accepts variant data types, allowing any type of user-specified data to be passed to the callback VI. For example, if the callback VI needs to reference the name of the main VI, the main VI's name (a string) could be passed as a user parameter to this function. The callback VI, when invoked, receives this data.
In our scenario, we aim for the callback VI to issue a corresponding LabVIEW user-defined event after the "Toolbar" generates a "ButtonClick" event. This strategy allows for centralized event handling within the main program's event loop, enhancing code readability. Thus, the reference for the user-defined event needs to be passed to the callback VI, making it the user parameter in this case. Detailed explanations regarding the Event class, related VIs, and the callback VI's implementation can be found in the section on User Interface Programming.
After configuring the user parameter, right-clicking the "VI reference" input allows for the creation of a callback VI specific to the event:
The newly crafted callback VI starts off without code but is pre-populated with event-related inputs, including "event generic data", "control reference", "event data", and "user parameter":
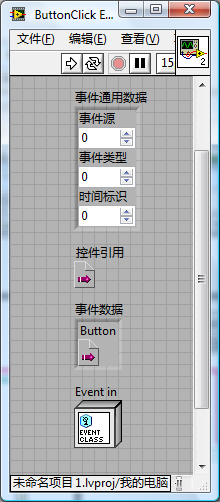
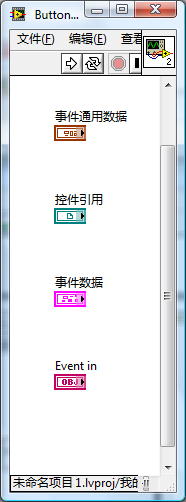
The event data includes information sent by the ActiveX control alongside the event. In the case of the "Toolbar’s" "ButtonClick" event, this data is the button's reference. This allows access to the button's details, such as the "Key (Label)", which may be necessary for the program.
The role of our callback VI is to identify which button was clicked and then launch a LabVIEW user-defined event named after the button’s label. Inputs that are not utilized in the program should still be retained on the block diagram.
Through this straightforward callback function, the ActiveX control event is transformed into a LabVIEW user-defined event, enabling the main program's event loop to incorporate the corresponding handling logic:

ActiveX Documents
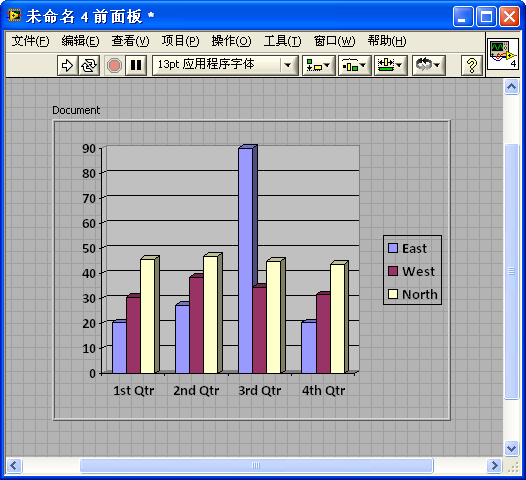
Software like Microsoft Office allows its documents to be displayed within other applications through ActiveX containers, termed ActiveX documents. In LabVIEW, you can insert not only controls into an ActiveX container but also ActiveX documents, such as a chart document:
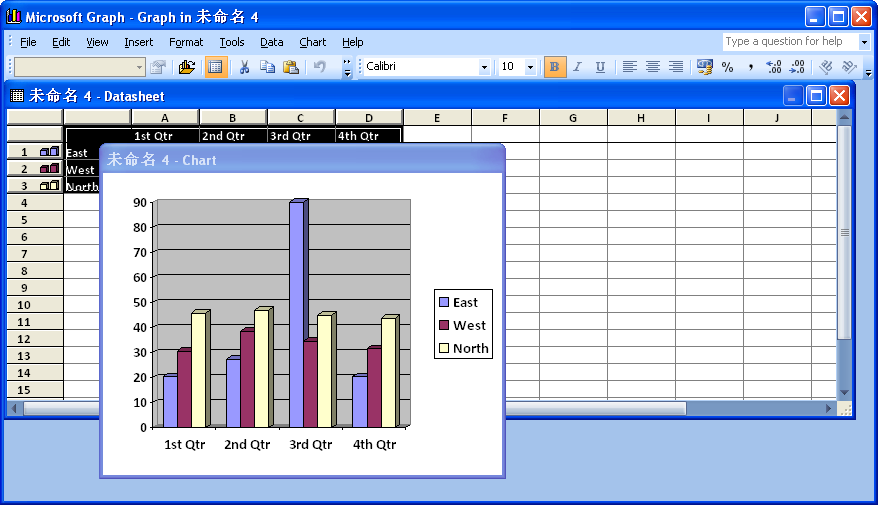
Differing from ActiveX controls, ActiveX documents cannot be modified via LabVIEW code. To edit an ActiveX document, right-click on the document and select "Edit Object", This action opens the document's associated editor (e.g., Microsoft Office), where any necessary modifications can be made:
The appearance of an edited ActiveX document could be as follows:
ActiveX Automation
Broadly, ActiveX refers to Microsoft's complete COM (Component Object Model) architecture. LabVIEW leverages ActiveX automation to access services offered by the COM architecture that lack direct ActiveX control counterparts.
Without a direct control, LabVIEW cannot obtain an ActiveX object reference directly from a control. Thus, the "Connectivity -> ActiveX -> Open Automation Refnum" function is utilized to create an ActiveX object and retrieve its reference. To use this function, specify the ActiveX object's type by dragging "Open Automation Refnum" onto the block diagram, then create a constant for its "automation refnum" input. Right-click this constant to select the ActiveX class:
For example, to utilize Microsoft's text-to-speech service, select the "Microsoft Speech Object Library" type library from the ActiveX Object dialog box and then choose the "ISpeechVoice" object:
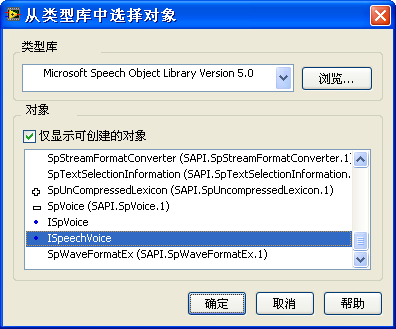
This process creates an ActiveX object. Subsequent code can use property nodes and invoke nodes to adjust the ActiveX object's properties or to call its methods. By invoking the "Speak" method of "ISpeechVoice", the computer can audibly read a segment of text. Running the program illustrated below, for instance, will have the computer voice the phrase "I love LabVIEW!"
.NET
The .NET Framework is a comprehensive software development platform offered by Microsoft. The market is replete with a broad array of controls and services built on the .NET architecture, available for user selection. These can be seamlessly integrated and utilized within LabVIEW, with the methods for doing so closely mirroring those used for ActiveX objects. Thus, to avoid repetition, this chapter will not delve into those details but will instead present a straightforward example.
Among the .NET library's offerings is a web browser control. To use it, place a .NET container on the VI's front panel and then insert the "WebBrowser" control from the "System.Windows.Forms" assembly:
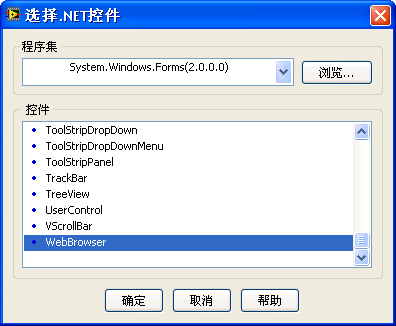
To browse a webpage, simply call its "Navigate" method:
EXE
With the "Connectivity -> Libraries & Executables -> System Exec.vi", LabVIEW programs can invoke external applications. This VI leverages command-line instructions to launch an external application or execute a system command from within LabVIEW, enabling actions like opening a web browser to navigate to a specified webpage or launching Notepad to display a text file.
The illustration below shows how to initiate the Notepad application from LabVIEW.
For more examples of employing the execute system command, consult the [LabVIEW]\examples\comm directory, where you can find the Calling System Exec VI.