Dynamically Creating and Modifying VIs
You're likely already acquainted with writing or modifying a VI. Yet, some VIs might involve monotonous and repetitive development tasks, leading to the desire for automation. Consider a project comprising hundreds of VIs, each requiring the addition of copyright information, or needing to change all controls named “xxx handle” to “xxx reference.” Manually updating each VI is not only tedious but also prone to errors or omissions. This section introduces how to programatically handle these VI editing and modification tasks.
VI Scripting Permissions
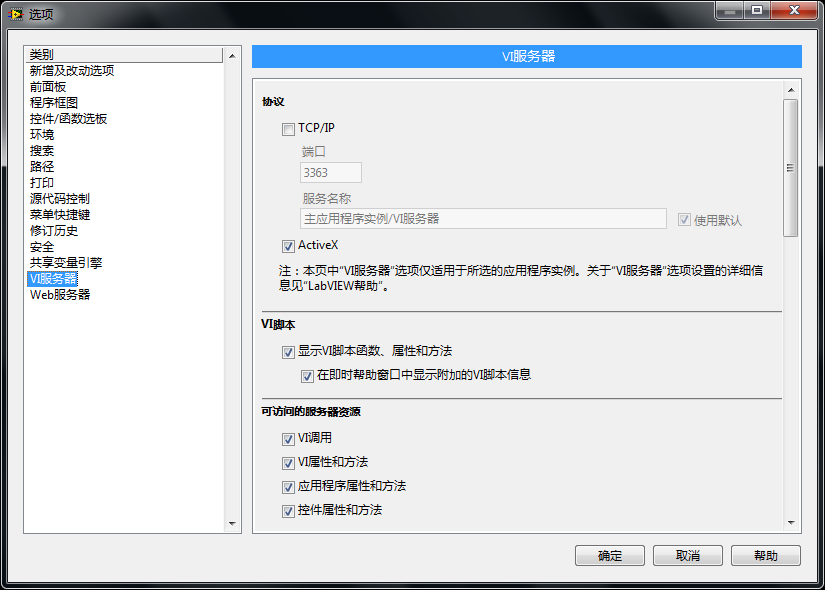
The VI scripting-related properties and methods previously mentioned are readily available in the LabVIEW Professional edition without needing special permission. However, some of the more potent VI scripting capabilities aren't enabled by default. For tasks like creating new VIs or VI elements such as controls and functions, or altering a VI's block diagram, these advanced features need to be activated. Starting from LabVIEW 2010, the option to enable these features is found in the LabVIEW options dialog. Within the options, under the VI Server page, there's a VI Scripting option. Checking this box activates VI scripting capabilities:

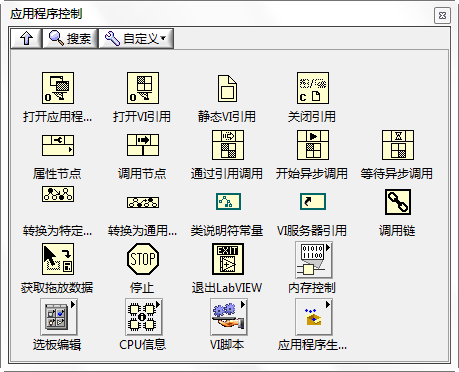
After enabling VI scripting permissions, a new subpalette named VI Scripting becomes available in the "Application Control" function palette:


This subpalette introduces some novel functions. The "New VI" function creates new VIs; "Open VI Object Reference" allows for opening references to objects on a VI, like controls and functions, by their labels. Functions similar to "Controls[]" for the front panel and "Nodes[]" for the block diagram can also achieve comparable outcomes. "New VI Object" facilitates the creation of new objects; "Traverse for GObjects" obtains references for all objects of a certain type on a VI. This function serves a purpose very similar to that of "Get Control.vi", discussed in the section on "[Getting Object References](vi_server_for_ui#Getting Object References)", and could replace "Get Control.vi" going forward.
With VI scripting permissions activated, a broader array of properties and methods becomes available. The image below shows a property selection menu for a VI object type, listing several properties like “Include Compiled Code,” “Block Diagram,” and “Block Diagram Window” that become accessible only after activation.

The capabilities granted through these permissions are more extensive, enabling activities such as the creation or modification of VI code. When these privileged properties or methods are selected, the corresponding property nodes or invoke nodes are displayed in light blue, distinct from the previously seen pale yellow.
Creating a VI
The "New VI" function allows for the creation of a new VI, providing you with its reference. By activating the VI's "Front Panel -> Open" and "Block Diagram -> Open" properties, you can display both its front panel and block diagram:
After executing this program, a newly created VI will appear on your computer screen, behaving identically to when you select "File -> New VI" from LabVIEW's menu.
Adding New Controls
Once you have an empty VI, the next consideration is filling it with content. For instance, you might begin by adding two numeric controls. This is accomplished using the "Create VI Object" function. Providing this function with the appropriate control type, reference type, position, and the owner of the new control (here referring to the reference of the newly created VI) enables the creation of a new control on this VI. The block diagram for adding new controls is illustrated below:

Executing the program above results in the front panel of the created VI as shown here:

Creating the Block Diagram
Creating nodes on the block diagram follows the same procedure as creating controls on the front panel. The image below is a segment of an example program that skips over the initial creation of a new VI, focusing instead on the part that constructs content for the block diagram:
Running the code depicted will generate a new addition function and a numeric constant on the block diagram of the newly created VI.
Beyond just creating nodes on the block diagram, you also need to connect them with wires. This is done using the "Connect Wire" method for terminals, allowing you to link two terminals together. The program illustrated below shows how to connect the newly created numeric constant to the addition function:

All other terminals also need to be interconnected, culminating in a complete block diagram. This encompasses the creation of the VI, addition of controls, generation of nodes on the block diagram, and their subsequent wiring:

Executing the program illustrated above produces the block diagram for the new VI as shown below:
Programmatically creating a new VI is an uncommon necessity, typically reserved for scenarios requiring the generation of many VIs. For instance, a company developing hardware drivers might need to mass-produce VIs with similar panels and block diagrams. Moreover, scripting programs to construct VI block diagrams is also a method used in creating XControls and XNodes.
Batch Modifying VIs
A common scenario in practical applications involves needing to batch modify existing VIs. For example, you might have a project composed of several dozen VIs and later receive new requirements necessitating changes to a particular attribute across all VIs, adjustments to similar code snippets within them, or updates to the layout of all front panels. When such modifications are uniform across each VI, programming-based unified changes are highly efficient.
Take a straightforward task as an example: When you're ready to distribute a set of VIs you've developed to users, you may need to password-protect these VIs to protect intellectual property rights. The first step in this process is to gather the paths of all the VIs that need to be modified. For this example, we'll use the simplest approach by listing all the VIs within a specified folder. Each VI is then opened individually, and modifications are made using properties and methods. In this case, we're employing the VI's "Lock State -> Set" method to apply a password to the VI. It's imperative to save the VI after making modifications; otherwise, all changes will be lost once the VI reference is closed. Saving the VI is done with the "Save -> Instrument" method (noting that VI stands for "Virtual Instrument"). The code for accomplishing this task is shown below: